


Atak
-
Benutzer seit
-
Letzter Besuch
Posts erstellt von Atak
-
-
-
Threw the body together with a couple servos, NiMH battery pack, chop sticks and some other parts laying around the house.
 Currently it is setup for popping on a Tinkerforge Master and Servo brick. A WIFI extension will be used to control this bot using my computer and WIFI router. I will also program an ATmega8 AVR for use in controlling this thing. If you have any more ideas on what I can do to it, let me know.
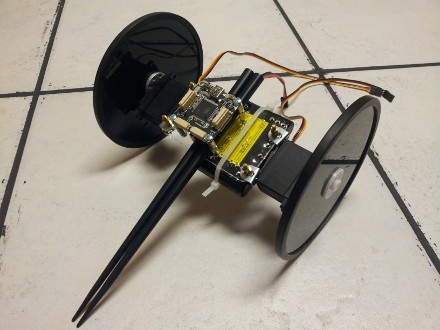
-
-
I was thinking you guys would have it set up where I would have to have 2 wifi extensions... one connected to the computer and another connected to whatever im running with wireless. Now I see that I just need one wifi extension which is awesome. So when connecting to the wifi extension, do I need a brick connected whatsoever to my computer? Or do I just use brickv to connect to my wireless router and control everything from that?
-
Is there an easy way to have a brick/bricklet function without being powered by a computer? Or would we just have to rewrite the firmware?
-
At the moment I only have the master brick, io16, breakout, and some sensors. I am wanting to control a couple servos I have laying around. This is the model of the servo...http://www.servocity.com/html/hs-311_standard.html
I'll probably end up buying the DC brick later but until then, is there any way I could use the master brick to send pulses or anything? I'm pretty new to this stuff.
I would be powering the servos with a separate battery pack.
-
I reinstalled MySQL and got it working.
This is the output I get with that command...
Installed packages, channel __uri:==================================
Package Version State
Tinkerforge 1.0.11 stable
Now, when I open the page ExampleCallback.php which I have placed on my Apache server, it does nothing but display a blank page.
My host, port, and uid are correct...
$host = 'localhost';$port = 4223;
$uid = '5Jj'; // Change to your UID
I've played around with these settings within the PHP file...
require_once('Tinkerforge/IPConnection.php');require_once('Tinkerforge/BrickletAmbientLight.php');
use Tinkerforge\IPConnection;
use Tinkerforge\BrickletAmbientLight;
I'm thinking my problem may be permissions or something? or something to do with the ports?
I have run this command to set permissions...
find . -type f -exec chmod 644 {} \; && find . -type d -exec chmod 755 {} \; -
Ive been using parts with Python but now want to start playing with PHP.
When I run the command "pear install Tinkerforge.tgz" I get this error...
PHP Warning: PHP Startup: Unable to load dynamic library '/usr/lib/php5/20090626+lfs/mysql.so' - /usr/lib/php5/20090626+lfs/mysql.so: cannot open shared object file: No such file or directory in Unknown on line 0PHP Warning: PHP Startup: Unable to load dynamic library '/usr/lib/php5/20090626+lfs/mysqli.so' - /usr/lib/php5/20090626+lfs/mysqli.so: cannot open shared object file: No such file or directory in Unknown on line 0
PHP Warning: PHP Startup: Unable to load dynamic library '/usr/lib/php5/20090626+lfs/pdo_mysql.so' - /usr/lib/php5/20090626+lfs/pdo_mysql.so: cannot open shared object file: No such file or directory in Unknown on line 0
Ignoring installed package __uri/Tinkerforge
So does this mean I need to install MySql in order to use PHP with the bricks/bricklets?
-
-
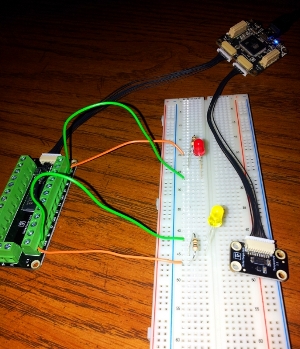
Temperature Sensor
Using the io16 and temperature bricklet along with with a master brick from Tinkerforge, I have created a simple temperature sensor project which outputs its' readings to LEDs on a breadboard. The red LED lights up during warmer temperatures and the yellow LED lights up during cooler temperatures.
#!/usr/bin/env python # -*- coding: utf-8 -*- # Temperature Sensor using IO16 and Temperature bricklets import os HOST = "localhost" PORT = 4223 UID = "xXx" # Change to your UID for IO16 bricklet UID2 = "xXx" # Change to your UID for Temperature bricklet from tinkerforge.ip_connection import IPConnection from tinkerforge.bricklet_io16 import IO16 from tinkerforge.bricklet_temperature import Temperature ipcon = IPConnection(HOST, PORT) # Create IP connection to brickd io = IO16(UID) # Create device object ipcon.add_device(io) def cb_temperature(temperature): running = True while running: temp = str(temperature/100.0) if str(2650) < temp: io.set_port_configuration('b', 1 << 0, 'o', False) # Set pin 0 on port b to output low io.set_port_configuration('b', 1 << 7, 'o', True) # Set pin 7 on port b to output high os.system('clear') # use 'clr' with Windows print 'Hot' # display status print (str(temperature/100.0) + ' °C') # get reading return elif str(2650) > temp: io.set_port_configuration('b', 1 << 0, 'o', True) # Set pin 0 on port b to output high io.set_port_configuration('b', 1 << 7, 'o', False) # Set pin 7 on port b to output low os.system('clear') print 'Cold' # display status print (str(temperature/100.0) + ' °C') # get reading return else: print 'Reading' return if __name__ == "__main__": t = Temperature(UID2) # Create device object ipcon.add_device(t) # Add device to IP connection # Don't use device before it is added to a connection # Set Period for temperature callback to 1s (1000ms) # Note: The callback is only called every second if the # temperature has changed since the last call! t.set_temperature_callback_period(1000) # Register temperature callback to function cb_temperature t.register_callback(t.CALLBACK_TEMPERATURE, cb_temperature) raw_input('Press key to exit\n') # Use input() in Python 3 ipcon.destroy() -
I just added to the Python section. I wish there were more English speaking people on here. I think its confusing because the forum defaults to German or some other language.
-
Done. Although I'm new to the Wiki stuff so I'm sure someone can make it look better. I'll add onto it as I play with Python more.
-
I'm learning Python so I wrote some scripts for the Ambient Light and Linear Poti bricklets. This may be useful for people who are new to programming.
This gives a basic idea on how to use the bricklets as a switch.
Ambient Light:
#!/usr/bin/env python # -*- coding: utf-8 -*- import os HOST = "localhost" PORT = 4223 UID = "xxx" # Change to your UID from tinkerforge.ip_connection import IPConnection from tinkerforge.bricklet_ambient_light import AmbientLight # Callback function for illuminance callback (parameter has unit Lux/10) def cb_illuminance(illuminance): less = '''Light.\n oooooooooooooooooooooooooo\n oooooooooooooooooooooooooo\n oooooooooooooooooooooooooo\n oooooooooooooooooooooooooo\n oooooooooooooooooooooooooo\n oooooooooooooooooooooooooo''' more = '''Dark.\n --------------------------\n --------------------------\n --------------------------\n --------------------------\n --------------------------\n --------------------------''' running = True while running: # Test with print('Illuminance: ' + str(illuminance/10.0) + ' Lux') lux = str(illuminance/10.0) if str(49) < lux: os.system('clear') print less break if str(51) > lux: os.system('clear') print more break if __name__ == "__main__": ipcon = IPConnection(HOST, PORT) # Create IP connection to brickd al = AmbientLight(UID) # Create device object ipcon.add_device(al) # Add device to IP connection # Don't use device before it is added to a connection # Set Period for illuminance callback to 1s (1000ms) # Note: The illuminance callback is only called every second if the # illuminance has changed since the last call! al.set_illuminance_callback_period(1000) # Register illuminance callback to function cb_illuminance al.register_callback(al.CALLBACK_ILLUMINANCE, cb_illuminance) raw_input('Press key to exit\n') # Use input() in Python 3 ipcon.destroy()Linear Poti:
#!/usr/bin/env python # -*- coding: utf-8 -*- import os HOST = "localhost" PORT = 4223 UID = "xxx" # Change to your UID from tinkerforge.ip_connection import IPConnection from tinkerforge.bricklet_linear_poti import LinearPoti # Callback function for position callback (parameter has range 0-100) def cb_position(position): less = '''Switch Off.\n -------------\n -------------\n -------------\n 0000000000000''' more = '''Switch On.\n 0000000000000\n -------------\n -------------\n -------------''' running = True while running: # Test with print('Position: ' + str(position)) slide = str(position) if str(49) < slide: os.system('clear') print less break if str(51) > slide: os.system('clear') print more break if __name__ == "__main__": ipcon = IPConnection(HOST, PORT) # Create IP connection to brickd poti = LinearPoti(UID) # Create device object ipcon.add_device(poti) # Add device to IP connection # Don't use device before it is added to a connection # Set Period for position callback to 0.05s (50ms) # Note: The position position is only called every 50ms if the # position has changed since the last call! poti.set_position_callback_period(50) # Register position callback to function cb_position poti.register_callback(poti.CALLBACK_POSITION, cb_position) raw_input('Press key to exit\n') # Use input() in Python 3 ipcon.destroy()
breakout board explanation?
in General Discussion
Geschrieben
**Edit > when trying all the pins, I notice the SCL pin on the breakout board seems to give me the most accurate temperature reading, is this correct?
I'm playing with the breakout board and I have it connected to the Temperature brick.
I have the 5V and GND pin connected to the 5V and GND on my Arduino Leonardo board. Now in my Temperature Sketch with Arduino, I am using the Analog pin A0 with my Arduino. Which pin on the Tinkerforge Breakout board do I need to connect A0 to in order to get a correct temperature reading?
Here is my Arduino sketch...
    //TMP36 Pin Variables
    int sensorPin = 0; //the analog pin the TMP36's Vout (sense) pin is connected to
    //the resolution is 10 mV / degree centigrade with a
    //500 mV offset to allow for negative temperatures
    /*
    * setup() - this function runs once when you turn your Arduino on
    * We initialize the serial connection with the computer
    */
    void setup()
    {
    Serial.begin(9600); //Start the serial connection with the computer
    //to view the result open the serial monitor
    }
    void loop() // run over and over again
    {
    //getting the voltage reading from the temperature sensor
    int reading = analogRead(sensorPin);
    // converting that reading to voltage, for 3.3v arduino use 3.3
    float voltage = reading * 5.0;
    voltage /= 1024.0;
    // print out the voltage
    Serial.print(voltage); Serial.println(" volts");
    // now print out the temperature
    float temperatureC = (voltage - 0.5) * 100 ; //converting from 10 mv per degree wit 500 mV offset
    //to degrees ((volatge - 500mV) times 100)
    Serial.print(temperatureC); Serial.println(" degrees C");
    // now convert to Fahrenheight
    float temperatureF = (temperatureC * 9.0 / 5.0) + 32.0;
    Serial.print(temperatureF); Serial.println(" degrees F");
    delay(1000); //waiting a second
    }