
CChris
Members
-
Benutzer seit
-
Letzter Besuch
Alle erstellten Inhalte von CChris
-
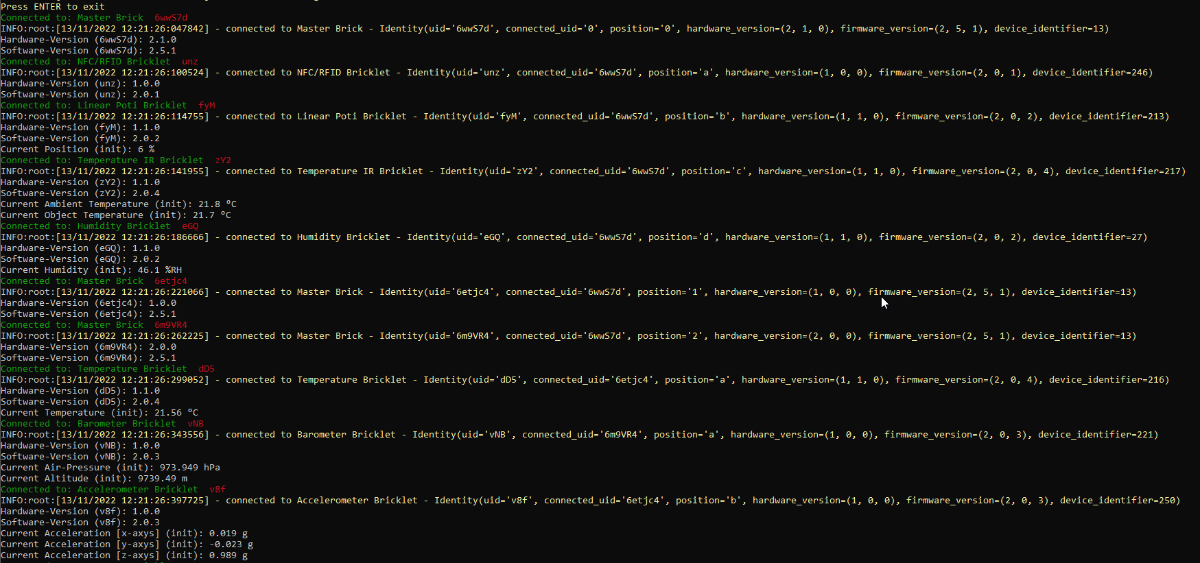
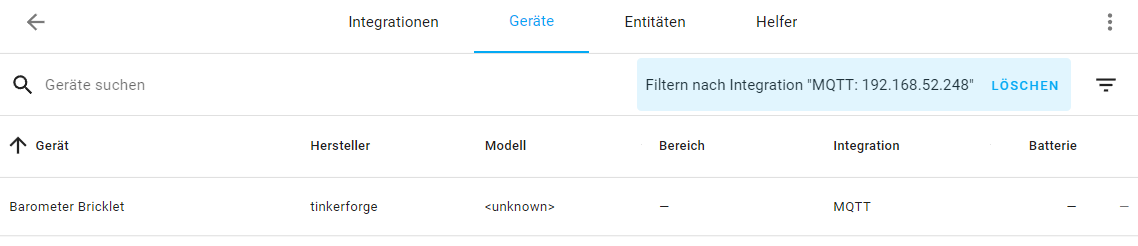
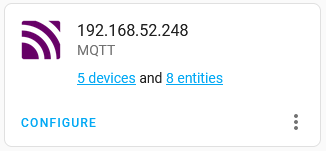
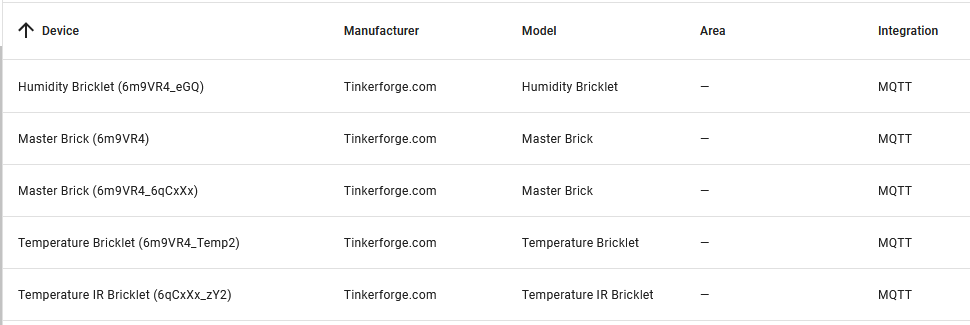
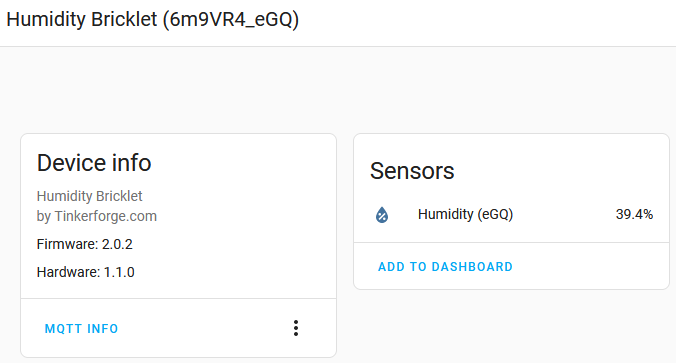
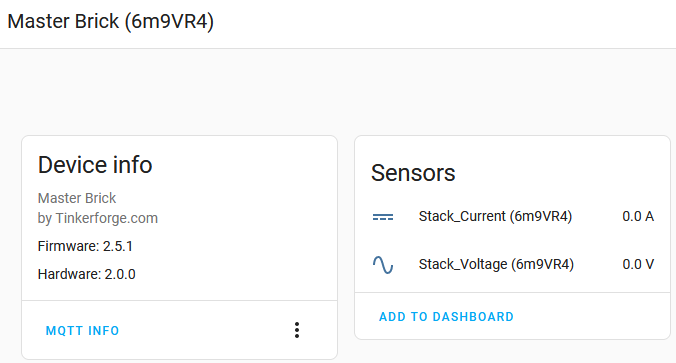
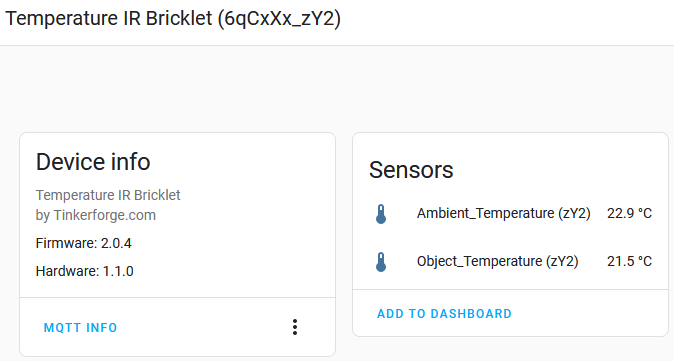
so, ich bin ein klein wenig weiter :) Die Auto-Erkennung funktioniert zwar noch nicht so zuverlässig, wie ich es gerne hätte ... das kann aber ggf. auch an meinem System liegen, da ich die Sensoren in HA entsprechend oft gelöscht und neu angelegt habe... Der nächste durchlauf wird daher mal mit einer "frischen" Datenbank sein ^^ Im Moment ist nur eine kleine Handvoll an alten Sensoren im Code umgesetzt... weitere werden folgen, diese kann ich aber mangels Hardware selber kaum testen. Für jeden Brick & jedes Bricklet wird ein eigenes "Device" in HomeAssistant angelegt Jedes Device ist dabei um die Information der UID - sowie, wenn vorhanden der UID des Bricks, an welches es angeschlossen ist benannt. Hier ist erkennbar, dass das Humidity Bricklet (eGQ), der MasterBrick (6qCxXx), das Temperature Bricklet (Temp2) und das Temperature IR Bricklet (zY2) jeweils am Master Brick (6m9VR4) angeschlossen sind. Diese Unterscheidung wird ggf. später notwendig, sollten mehrere eigenständige Stapel genutzt werden. Ob meine Software damit überhaupt umgehen kann, habe ich noch nicht getestet - der Fokus liegt im Moment nach wie vor auf einer rudimentären Funktionsweise... Jedes Device liefert informationen zur Installierten Firmware Version sowie der Hardware-Revision des Bricks / Bricklets. Ebenso werden die entsprechenden Sensor-Entitäten angelegt, wobei auch diese zur Identifizierung die UID mit im Namen tragen. Die Sensoren werden einmal bei der Enumerierung mittels .getXyz() abgerufen - danach über Callbacks, wenn sich der Wert ändert. Im Moment gibt es allerdings noch kleinere Probleme mit dem Sensor-Status direkt nach der Enumerierung... hier muss ich noch ein wenig arbeiten, da es ggf. notwendig ist, nach der Enumerierung den Stapel einmal zu resetten. Vermutlich irgend ein Timing Thema... ?! Eines der größten Probleme wird wohl sein, Aktoren hinzuzufügen. Mein Programm ist im Moment darauf ausgelegt, die Daten abzurufen und an HA zu schicken. Das funktioniert natürlich nicht, wenn eine eigene Programm-Logik vorhanden sein soll - oder aber, wenn aus HA heraus z.B. der Status eines Dual_Relay geändert werden soll... Hier wäre es zwar prinzipiell möglich, auf "eingehende" MQTT Nachrichten zu hören und dann entsprechende Aktionen auszuführen, da es sich aber stand jetzt noch nicht um eine eigene Integration für HomeAssistant handelt, können keine Steuerkomponenten hinzugefügt werden, welche das Automatisiert machen. Bei einer eigenständigen Integration würde sich auch der Umweg über MQTT erübrigen. Vielleicht gelingt es mir aber doch noch irgendwann, eine "halbwegs" brauchbare Integration zu machen...?
-
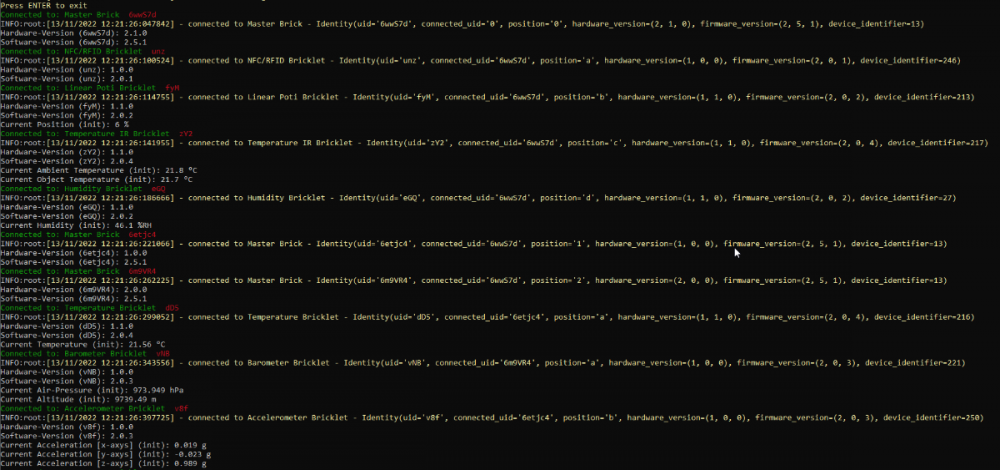
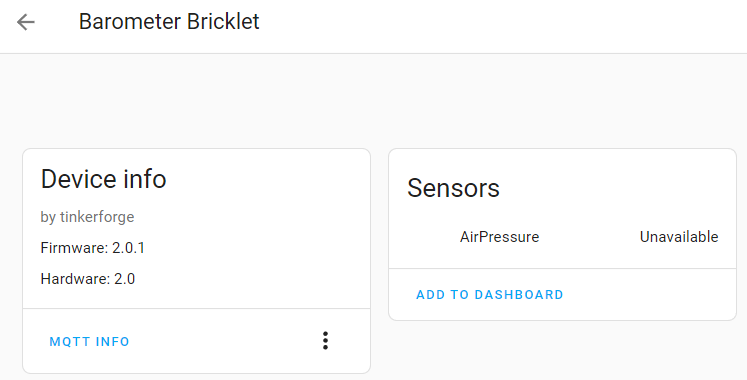
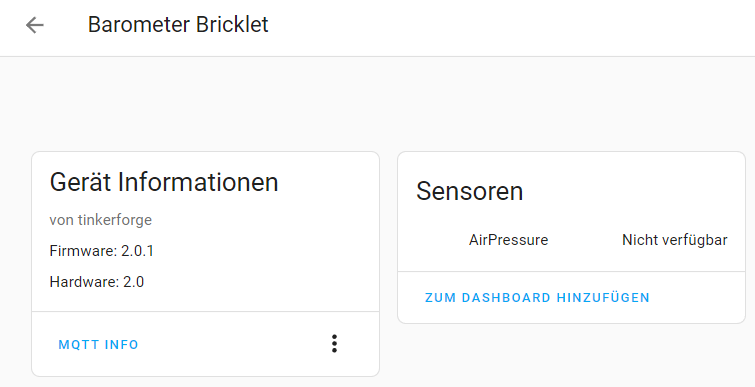
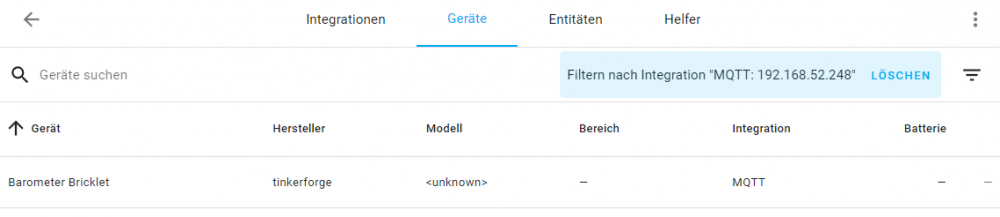
a short progress - update :) So far, the Software seems to work as expected... It does enumerate through all devices connected to the master - and is using the callbacks for each sensor... Since I want to recognize all possible devices, I need to implement the code for each brick and bricklet hardware - which is a lot of "copy & paste" work, since I haven't yet found another way to do this... # every single device needs to be listed here... see imports for reference if enumeration_type == tf_main.IPConnection.ENUMERATION_TYPE_DISCONNECTED: return if device_identifier == tf_main.BrickDC.DEVICE_IDENTIFIER: # 11 device = tf_main.BrickDC(uid, tf_main.ipcon) device_work(device, device.DEVICE_DISPLAY_NAME, uid) # nothing to do, since I don't have a DC Brick for testing elif device_identifier == tf_main.BrickMaster.DEVICE_IDENTIFIER: # 13 device = tf_main.BrickMaster(uid, tf_main.ipcon) device_work(device, device.DEVICE_DISPLAY_NAME, uid) device.register_callback(device.CALLBACK_STACK_VOLTAGE, lambda *args: tf_callbacks.cb_stack_voltage(uid, *args)) device.set_stack_voltage_callback_period(int(config.get('TINKERFORGE', 'CallbackPeriod'))) device.register_callback(device.CALLBACK_STACK_CURRENT, lambda *args: tf_callbacks.cb_stack_current(uid, *args)) device.set_stack_current_callback_period(int(config.get('TINKERFORGE', 'CallbackPeriod'))) elif device_identifier == tf_main.BrickServo.DEVICE_IDENTIFIER: # 14 device = tf_main.BrickServo(uid, tf_main.ipcon) device_work(device, device.DEVICE_DISPLAY_NAME, uid) # nothing to do, since I don't have a DC Brick for testing elif device_identifier == tf_main.BrickStepper.DEVICE_IDENTIFIER: # 15 device = tf_main.BrickStepper(uid, tf_main.ipcon) device_work(device, device.DEVICE_DISPLAY_NAME, uid) # nothing to do, since I don't have a DC Brick for testing elif device_identifier == tf_main.BrickRED.DEVICE_IDENTIFIER: # 16 device = tf_main.BrickRED(uid, tf_main.ipcon) device_work(device, device.DEVICE_DISPLAY_NAME, uid) ''' RED Brick is depricated, due to delivery issues for ICs. Replacements are HAT / HAT Zero as well as RaspberryPi compatible devices There are several options to controll the Software running on the RED Brick: example: start_program(program_id) -> to start a specific program on the RED Brick example: continue_program_schedule(program_id) example: get_program_schedule(program_id) example: set_program_schedule(program_id) ''' elif device_identifier == tf_main.BrickIMU.DEVICE_IDENTIFIER: # 17 device = tf_main.BrickIMU(uid, tf_main.ipcon) device_work(device, device.DEVICE_DISPLAY_NAME, uid) # nothing to do, since I don't have a DC Brick for testing elif device_identifier == tf_main.BrickIMUV2.DEVICE_IDENTIFIER: # 18 device = tf_main.BrickIMUV2(uid, tf_main.ipcon) device_work(device, device.DEVICE_DISPLAY_NAME, uid) # replacement for the IMU 1.0... ''' device.register_callback(device.CALLBACK_ALL_DATA) # <-- getting all data periodically device.register_callback(device.CALLBACK_ACCELERATION) # <-- getting only acceleration data device.register_callback(device.CALLBACK_ANGULAR_VELOCITY) # <-- getting only angular velocity data device.register_callback(device.CALLBACK_GRAVITY_VECTOR) # <-- getting only gravity data device.register_callback(device.CALLBACK_LINEAR_ACCELERATION) # <-- getting only linear acceleration data device.register_callback(device.CALLBACK_MAGNETIC_FIELD) # <-- getting only magnetic field data device.register_callback(device.CALLBACK_ORIENTATION) # <-- getting only orientation data device.register_callback(device.CALLBACK_QUATERNION) # <-- getting only quaternion data device.register_callback(device.CALLBACK_TEMPERATURE) # <-- getting only temperature data device.get_acceleration() # <-- getting acceleration data (could be required for init) device.get_orientation() # <-- getting orientation data (could be required for init) device.get_all_data() # <-- getting all data (could be required for init) ''' elif device_identifier == tf_main.BrickSilentStepper.DEVICE_IDENTIFIER: # 19 device = tf_main.BrickSilentStepper(uid, tf_main.ipcon) device_work(device, device.DEVICE_DISPLAY_NAME, uid) ''' replacement for the Stepper Brick... but do we need Stepper-Information in HomeAssistant? we could get some information such as position-reached but probably it won't be possible to controll the stepper motor with this software / through HomeAssistant (maybe, we can set some "modes" like) set target position / set current position (?) / configure the step-resolution... etc. ''' elif device_identifier == tf_main.BrickletAmbientLight.DEVICE_IDENTIFIER: # 21 device = tf_main.BrickletAmbientLight(uid, tf_main.ipcon) device_work(device, device.DEVICE_DISPLAY_NAME, uid) init_illuminance = device.get_illuminance() print("Current Illumination (init): " + str(init_illuminance / 10) + " lx") device.register_callback(device.CALLBACK_ILLUMINANCE, lambda *args: tf_callbacks.cb_illumination(uid, *args)) device.set_illuminance_callback_period(int(config.get('TINKERFORGE', 'CallbackPeriod'))) elif device_identifier == tf_main.BrickletCurrent12.DEVICE_IDENTIFIER: # 23 device = tf_main.BrickletCurrent12(uid, tf_main.ipcon) device_work(device, device.DEVICE_DISPLAY_NAME, uid) elif device_identifier == tf_main.BrickletCurrent25.DEVICE_IDENTIFIER: # 24 device = tf_main.BrickletCurrent25(uid, tf_main.ipcon) device_work(device, device.DEVICE_DISPLAY_NAME, uid) elif device_identifier == tf_main.BrickletDistanceIR.DEVICE_IDENTIFIER: # 25 device = tf_main.BrickletDistanceIR(uid, tf_main.ipcon) device_work(device, device.DEVICE_DISPLAY_NAME, uid) elif device_identifier == tf_main.BrickletDualRelay.DEVICE_IDENTIFIER: # 26 device = tf_main.BrickletDualRelay(uid, tf_main.ipcon) device_work(device, device.DEVICE_DISPLAY_NAME, uid) # nothing to do, since I don't have a DC Brick for testing elif device_identifier == tf_main.BrickletHumidity.DEVICE_IDENTIFIER: # 27 device = tf_main.BrickletHumidity(uid, tf_main.ipcon) device_work(device, device.DEVICE_DISPLAY_NAME, uid) init_humidity = device.get_humidity() print("Current Humidity (init): " + str(init_humidity / 10) + " %RH") device.register_callback(device.CALLBACK_HUMIDITY, lambda *args: tf_callbacks.cb_humidity(uid, *args)) device.set_humidity_callback_period(int(config.get('TINKERFORGE', 'CallbackPeriod'))) # and so on - for each device that COULD be connected... def device_work(device, device_display_name, uid): identifier = device.get_identity() hw_version = identifier[3] sw_version = identifier[4] print(f"{Fore.GREEN}Connected to: {device_display_name} {Fore.RED}{uid}{Style.RESET_ALL}") tf_log.log_output_info(f"connected to {device_display_name} - {identifier}") print("Hardware-Version (" + uid + "): " + write_version(hw_version)) print("Software-Version (" + uid + "): " + write_version(sw_version)) def write_version(version): version_no = str(version).replace(" ", "").replace("(", "").replace(")", "").replace(",",".") return version_no The Console-Output for this initialisation: after initializing and getting the current state of the sensors, I am calling the different callbacks for each device - so the states are being updated when the state does change: So - right now, I am working on the implementation to send these information over MQTT. Since I want to use the HomeAssistants MQTT Autodiscovery function, I can't use the MQTT Bindings directly... I have to change the topics and payload... a first static test was working so far... The MQTT integration has detected a new device - the Barometer Bricklet from tinkerforge. This device is creating the sensor "AirPressure" - and delivers the Firmware and Hardware-Information until now. I still need to implement the "State" Topic, so that the sensor will get the information ... and then, I need to change the code that this will be done dynamically for each device... So, still some work to do... and I am still not sure if I can implement a way to receive information from HomeAssistant, since it would be required that homeassistant does know to which topic something needs to be sent... so this would still be a lot of "manual configuration work" in HA... until I could MAYBE build some kind of integration which does create the entities and send the topics to the software. So, I think, this project can be somehow called a "brickviewer" for HomeAssistant (only viewer, atm)

-
first tests of HomeAssistants Auto-Discovery are working... :) Now, I need to check, how to do that more dynamically during the program run-time and also publish the sensors state :D If my code is working so far, I'll try to see if I can redesign this in a way that it could also be used in other programs... or at least, I can create a small documentation on how this could be done...🤔
-
Hi, Does anyone know, if the ESP32 Brick is working with ESPHome ? Before I would buy these brick for some tests, I would like to know, if anyone has already tried this... :)
-
Hi @ngblume: ich habe mir die Sache mit der sich ändernden ID bei einem Batteriewechsel noch einmal durch den Kopf gehen lassen. Es ist zwar wirklich eine ziemlich doofe Sache - und ich verstehe nicht, warum das so umgesetzt wurde, aber Programmiertechnisch könnte man das ggf. abfangen... Das ist jetzt nur ein Theoretischer Ansatz - ich habe ihn selber noch nicht versucht... 1. aufbauen einer Verbindung zum "Outdoor-Weather-Bricklet" 2. ermitteln der erkannten IDs 3. Für jede erkannte ID wird programmtechnisch eine eigene ID generiert. 4. diese Infos werden in einer Liste o.ä. geschrieben - sodass man eine Zuordnung der Wetter-Stations-ID zu der eigens generierten ID hat. Nun gibt es m.E. drei Möglichkeiten: 1 - eine neue ID kommt hinzu, alle zuvor erkannten IDs sind noch vorhanden: -> es wird ein Eintrag in der Liste ergänzt. 2 - eine neue ID kommt hinzu, eine zuvor gespeichterte ist nicht mehr 'verbunden': -> in diesem Fall kann man davon ausgehen, dass sich die ID eines bereits bestehenden Gerätes durch z.B. einen Batteriewechsel geändert hat. Es wird daher ein Update auf den Listeneintrag der IDs gemacht ... die neue ID bekommt nun die eigene ID zugewiesen. 3 - eine ID wird nicht mehr gefunden, es kommt aber keine neue Hinzu: -> man lässt den Eintrag in der Liste bestehen, falls doch noch Fall 2 Eintritt... Wie gesagt, bisher nur Theoretisch... da ich selber keine Wetterstation im Einsatz habe - und selber aktuell nur ältere Bricklets meist aus der 1. Generation da habe... Aber meine Frau möchte ggf. tatsächlich so ein Teil noch haben, also könnte ich mich irgendwann demnächst mal genauer damit Außeinander setzen :D Allerdings frage ich mich gerade auch, ob das Weather-Bricklet NUR mit den hier verfügbaren Wetterstationen zurecht kommt, oder ggf. auch mit anderen Funk-Stationen, welche auf 433 MHz laufen? Weißt du da zufällig etwas?
-
Hi, danke für die Info :) OK, ich habe keine Outdoor-Wetterstation zum testen da. Tatsächlich ist die Hardware, welche ich hier habe z.T. 10 Jahre alt und hatte bisher nur Staub angesammelt... daher die Idee, mit dieser jetzt vielleicht doch etwas 'sinnvolleres' anzustellen :) Ja, um das "Mapping" kommt man nicht drum herum, aber das ist letztendlich bei Tinkerforge so, wie bei allen anderen Geräten auch - wenn ich z.B. ein Thermostat von Homematik austausche, muss ich dieses auch erst in der CCU anlernen - umbennen - dann wird es in HomeAssistant erkannt & dann kann ich es zuweisen. ggf. muss ich es auch hier noch einmal umbenennen um nicht alle Automatisierungen abändern zu müssen. Da sehe ich (zumindest im Moment) - eigentlich keinen großen Unterschied. Ich habe mir jetzt aber tatsächlich mal die Dokumentation für das Outdoor-Weather Bricklet angeschaut... ... jetzt steht hier leider nicht, ob der Identifier auch bei einem Batteriewechsel erhalten bleibt oder nicht - wenn nicht, macht das ja eine programmbasierte Zuweisung egal für was deutlich schwerer... Auf der anderen Seite... wie viele Outdoor-Wetterstationen hat man i.d.R. daran angeschlossen? Maximal vielleicht die Temperatur/LF-Sensoren ... da könnten ggf. mehrere im Einsatz sein...🤔
-
Hi, Ich versuche gerade ein Script zu schreiben, welches dann in der Lage sein soll, TF Bricks und Bricklets "dynamisch" auszulesen und Werte über den paho-mqtt client an einen Broker zu senden. Der Grund, warum ich diesen Weg gehe - und nicht direkt die MQTT Bindings von Tinkerforge nutzen möchte ist, dass ich eigentlich recht wenig Aufwand in die Konfiguration auf seiten HomeAssistant haben möchte. Ich möchte sämtliche Werte (erst einmal nur Sensoren einlesen und weiter geben) so strukturieren, dass sie über die Auto-Detection der MQTT integration erkannt werden und daraus dann direkt Sensoren generiert werden können. Dadurch spart man sich das händische Anpassen der Config, wenn es eine Änderung in der Hardware gegeben haben sollte. Später sollen, sofern ich das hinbekomme, auch Topics empfangen werden können, damit man auch aus HomeAssistant heraus "steuern" kann. Aktuell bin ich aber noch in einem sehr frühen Stadium... es wird also noch etwas Zeit brauchen, bis das ganze soweit sein wird...
-
thanks a lot :) That's perfect and exactly what I need... much appreciated :)
-
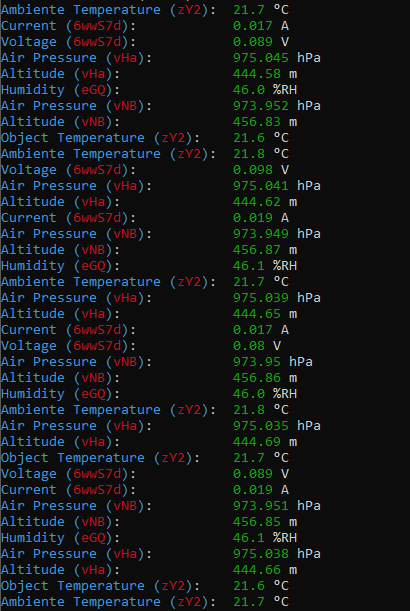
ok, I have made some first basic steps... this is still a very very basic python script for testing... # connection parameter HOST = "192.168.52.55" PORT = 4215 # these needs to be used dynamically later... # right now, they are only for testing BARO_1_UID = "vNB" BARO_2_UID = "vHa" from tinkerforge.ip_connection import IPConnection from tinkerforge.bricklet_barometer import BrickletBarometer def cb_enumerate(uid, connected_uid, position, hardware_version, firmware_version, devic> # removed output for shorter code here def cb_air_pressure(air_pressure): # here, I would like to output from which bricklet the information came # since we do have two barometers connected, the output should somehow include the uid of the bricklet...? print("Air Pressure: " + str(air_pressure/1000.0) + " hPA") def cb_altitude(altitude): # here, I would like to output from which bricklet the information came # since we do have two barometers connected, the output should somehow include the uid of the bricklet...? print("Altitude: " + str(altitude/100.0) + " m") if __name__ == "__main__": ipcon = IPConnection() # Create IP connection # connect to the barometer bricklet(s) # if multiple devices with the same device-id are found, it should be done dynamically # f.e. for each barometer in barometers... something like that. b1 = BrickletBarometer(BARO_1_UID, ipcon) b2 = BrickletBarometer(BARO_2_UID, ipcon) ipcon.connect(HOST, PORT) # Connect to brickd or to network attached device ipcon.register_callback(IPConnection.CALLBACK_ENUMERATE, cb_enumerate) ipcon.enumerate() # register the callback(s) and set the callback period(s) for the barometer bricklet(s) # if multiple devices with the same device-id are found it should be done dynamically # f.e. for each barometer in barometers... something like that b1.register_callback(b1.CALLBACK_AIR_PRESSURE, cb_air_pressure) b2.register_callback(b2.CALLBACK_AIR_PRESSURE, cb_air_pressure) b1.register_callback(b1.CALLBACK_ALTITUDE, cb_altitude) b2.register_callback(b2.CALLBACK_ALTITUDE, cb_altitude) b1.set_air_pressure_callback_period(1000) b2.set_air_pressure_callback_period(1000) b1.set_altitude_callback_period(1000) b2.set_altitude_callback_period(1000) I would like to know, if it is somehow possible to be a bit more dynamic with the detection of the connected bricklets? For example, I have two barometers connected. I would like to output the UID of the bricklet within the cb_air_pressure and cb_altitude into something like that: def cb_air_pressure(air_pressure): # something like that: print("Air Pressure " + UID + ": .....") def cb_altitude(altitude): # something like that: print("Altitude " + UID + ": .....") Also, I am pretty sure that this can be reduced and somehow be done for each device recognized: b1 = BrickletBarometer(BARO_1_UID, ipcon) b1.register_callback(b1.CALLBACK_AIR_PRESSURE, cb_air_pressure) b1.register_callback(b1.CALLBACK_ALTITUDE, cb_altitude) b1.set_air_pressure_callback_period(1000) b1.set_altitude_callback_period(1000) b2 = BrickletBarometer(BARO_2_UID, ipcon) b2.register_callback(b2.CALLBACK_AIR_PRESSURE, cb_air_pressure) b2.register_callback(b2.CALLBACK_ALTITUDE, cb_altitude) b2.set_air_pressure_callback_period(1000) b2.set_altitude_callback_period(1000) probably the syntax is not correct - but maybe, something like that: foreach(uid in barometer_uids) { b = BrickletBarometer(uid, ipcon) b.register.... b.set...... }
-
I am just thinking what the "best" format could be. It would be great, if the auto discover option would be able to create entities out of the different sensors directly.... So I would asume, the best option would somehow to follow the example above from my cpu_usage.... where also other information are given in the payload... In that case, it would require a own script for doing that - and including the different information into the payload... But I do will tests with the --global-topic-prefix, too - to see how the outcome in homeassistant will be :) - so, I have added the --global-topic-prefix to the command, but it seems that it was only applied to the "callback" part I couldn't see any "response" within the global topic suffic... so, checking the txt file now, if I might change the topic there.
-
yeah, sorry - I already figured this out :D It was a bit strange, because I had somehow in mind that using the password did work in other cases without "escaping" it ... *head on table*
-
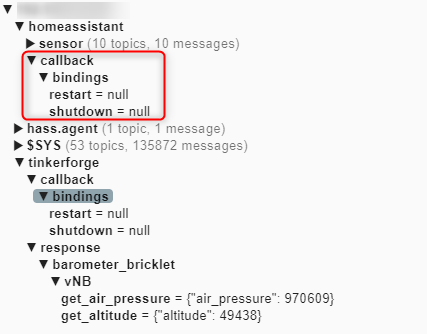
Hi, I want to connect my tinkerforge hardware with HomeAssistant over MQTT. Therefore, I am now testing the MQTT Bindings - and they are working - so far. I received the following in my MQTT Broker: tinkerforge/response/barometer_bricklet/vNB/get_air_pressure {"air_pressure": 970609} tinkerforge/response/barometer_bricklet/vNB/get_altitude {"altitude": 49438} But - I did not yet get them into HomeAssistant, because I do need to configure the MQTT plugin still to listen to the topic "tinkerforge"... Before I do this, I just wanted to know, if it would be possible, to change the topics. Why? Because the MQTT Plugin from HomeAssistant has an AutoDiscovery option... It would automatically discover messages when a specific topic will be used. The Documentation from HomeAssistant writes: by default, the auto-discovery prefix from Homeassistant is "homeassistant" This would mean, that the tinkerforge Topic should probably changed to: homeassistant/sensor/tinkerforge/UID/config {"air_pressure": 970609} homeassistant/sensor/tinkerforge/UID/config {"altitude": 49438} Another example, for which the Auto-Discovery has worked, is the sensor of my CPU usage from my computer: homeassistant/sensor/WSCCA/WSCCA_cpulast/config {"availability_topic":"homeassistant/sensor/WSCCA/availability","icon":"mdi:chart-areaspline","unique_id":"79647378-7aaa-43d9-bfcc-675684ea6ad9","unit_of_measurement":"%","device":{"identifiers":"hass.agent-WSCCA","manufacturer":"LAB02 Research","model":"Microsoft Windows NT 10.0.19044.0","name":"WSCCA","sw_version":"2022.13.0"},"name":"WSCCA_cpulast","state_topic":"homeassistant/sensor/WSCCA/WSCCA_cpulast/state"} WSCC is the hostname of the computer WSCC_cpulast is the name of the sensor. I guess, when I want to use a similar format for the payload and topics, I have to create my own script, which does get the sensor values - and then create the specific mqtt topic / payload within the script...? That's probably not working with the default "tinkerforge_mqtt" bindings, right?
-
ok, maybe, this fits better into the general discussion rather than on the project ideas section... :) I've noticed an issue while testing the MQTT Bindings. on my linux system... MQTT Bindings 2.0.16 I am calling the tinkerforge_mqtt with the following command: python3 /usr/local/bin/tinkerforge_mqtt --ipcon-host 123.456.78.9 --ipcon-port 4215 --broker-host 123.456.78.10 --broker-port 1883 --broker-username <user> --broker-password <password> --debug --show-payload --init-file /usr/local/bin/barometer_test.txt the password does contain some special characters - especially it is using an underscore _ followed by too exclamation marks !!, a questionmark and again an exclamartion mark: "_!!?" In this case, it seems, that the script can't handle the too exclamation marks - and does combine different parts of the other arguments. I got strange errors when executing the script, for example: tinkerforge_mqtt: error: unrecognized arguments: /usr/local/bin/tinkerforge_mqtt /usr/local/bin/tinkerforge_mqtt --h?! Here, you can see, that it has replaced the two exclamation marks from the password with the path: /usr/local/bin/tinkerforge_mqtt --h?! I am not sure, if this is an issue with the script itself - or if this might be related to the Debian - or maybe even with the Webshell from Proxmos... When I hit the arrow-up key to reuse the command, it did show the mixed-up command that was causing the issue. It happened every time when I used the command - until I've changed the password on the broker and removed these characters. After that, the script could be executed without any issues. Would it be possible to check, if this might be an issue in the script itself? Thanks! OK, I don't know why I haven't found this yesterday... !! is a logical NOT in the bash command... So this might explain the behave....
-
I think, somehow the script can't handle " !! " which is part of my broker-password. This will always be replaced by one of the previous commands I've entered - for example, it will be replaced with "nano /usr/local/bin/tinkerforge_mqtt.... that was it. After changing the password on my broker - it did work... So, the tinkerforge_mqtt can't handle an --broker-password argument with !! in it
-
some additions to the above... When I don't get the "Connection refused" - I am getting other error messages from the command: It seems, that the script does throw the arguments somehow together... This was the command I've typed: > python3 /usr/local/bin/tinkerforge_mqtt --ipcon-host 192.168.52.55 --ipcon-port 4215 --broker-host 192.168.52.248 --broker-port 1883 --broker-username admin --broker-password <password> --broker-tls-insecure --debug --show-payload --init-file barometer_test.txt This is the error I am getting: I don't know, where this is comming from... but when I press the arrow-up key to get the command, it has changed and (as mentioned above) mixes arguments together. Could this be a case, because my password does contain special characters like _ ! and ? tinkerforge_mqtt: error: unrecognized arguments: /usr/local/bin/tinkerforge_mqtt /usr/local/bin/tinkerforge_mqtt --h?!
-
ok, I think, I got it somehow... but unfortunately, my tests aren't running. I am trying to do the follwing: /usr/local/bin# >python3 tinkerforge_mqtt --ipcon-host 123.456.78.9 --ipcon-port 4215 --broker-host 123.456.78.10 --broker-port 1883 --broker-username myusername --broker-password mypassword_1120 --debug --show-payload --init-file tinkerforge_mqtt_test.txt I am pretty sure that my credentials are correct in the command, but the response from the Broker is: MQTT bindings: Connected to MQTT broker at 123.456.78.10:1883 paho.mqtt.client: Sending CONNECT (u1, p1, wr0, wq0, wf1, c1, k60) client_id=b'' phao.mqtt.client: Received CONNACK (0,5) MQTT bindings: Failed to connect to mqtt broker: Connection Refused: not authorised. What I've also noticed: When I hit the arrow-up key to bring the command back, the password that has been given in the arguments is missing some characters or has some irregular chars which I haven't typed in earlier... I can connect to the broker with these credentials without any issues with MQTT Explorer... so, any idea what could be wrong here? Just for reference: That's the content of my tinkerforge_mqtt_test.txt { "tinkerforge/request/barometer_bricklet/UID/get_air_pressure": {"register": true}, "tinkerforge/request/barometer_bricklet/UID/set_air_pressure_callback_period": {"period": 1000}, "tinkerforge/request/barometer_bricklet/UID/get_altitude": {"register": true}, "tinkerforge/request/barometer_bricklet/UID/set_altitude_callback_period": {"period": 1000}, "tinkerforge/callback/barometer_bricklet/UID/air_pressure": "", "tinkerforge/callback/barometer_bricklet/UID/altitude": "" }
-
Hi, in the past (a few years ago), I've tried to create some smaller project with Tinkerforge - but honestly speaking, I never really finished them. I tried to wirte some software in C# - but in the end, it did work - but never as stable as it was required for the use case - so I quit the projects and realized them with other components and hardware. Since then, my hardware was just laying around and collected dust... Now, I've decided to start again - but with a different approach... I am using HomeAssistant for getting information about our solar-production and energy usage - have my ev charging-station implemented and some other "smarthome" components... so now, I am thinking to create another project with my current tinkerforge hardware and integrate this into homeassistant, too. I already learned that there are some MQTT Bindings available - And, I could use MQTT in HomeAssistant... But, there are some questions left about the best "approach"... Now, I am struggling a bit with the decission, how to realize this project... for now, I have created a debian 11 lxc container in Proxmox - running brickd... A first python script, connecting to one of my bricks and barometer bricklet over tcp-ip (wifi 2.0 extension) seems to work so far. I have also installed the MQTT Bindings so far: > systemctl --type=service UNIT LOAD ACTIVE SUB DESCRIPTION brickd.service loaded active running Brick Daemon tinkerforge_mqtt.service loaded active running Tinkerforge MQTT API Bindings Now I am struggling a bit... Honesty speaking, I don't really see the correct approach right now... As far as I could get, the MQTT Bindings are based on the Python bindings. The tinkerforge_mqtt which comes with the bindings is "just" a python script, which does - more or less collect data from the bricklets - and send it to an mqtt broker. Also, it listens to topics from the broker and send this to the brick / Bricklets... Correct so far? In this case, it is pretty much what I had first in mind - I need to write a python script that reads the data - and send it to the Broker... So... how can I use the MQTT Bindings now? I have found the following under /etc tinkerforge_mqtt.cmdline sorry - if this may sound dumb... but honestly speaking the last time I had the Tinkerforge stuff in my hands was somewhere in 2016...
-
It seems that the documentation on how to install brickd on an actual debian bullseye is outdated and is using some depricated methods (like apt-key add) and also "lsb" commands... Can this documentation be updated - or is there already an updated version available somewhere? 1. The usage of "apt-key add" - apt-key is depricated root@tinkerforge-server:~# wget https://download.tinkerforge.com/apt/$(lsb_release -is | tr [A-Z] [a-z])/archive.key -q -O - | apt-key add - -bash: lsb_release: command not found Warning: apt-key is deprecated. Manage keyring files in trusted.gpg.d instead (see apt-key(8)). gpg: no valid OpenPGP data found. 2. lsb_release "command not found" The usage of lsb_command requires lbs-core but this seems to be depricated, too:
-
Hallo Zusammen, nach doch sehr langer Zeit habe ich meine kleine Sammlung an (alten) TF Komponenten wieder ausgegraben. Der Grund ist einfach - sie liegen derzeit bloß herum und ich möchte ihnen eine "Sinnvolle" Aufgabe geben. Sinnvoll in dem Sinne, dass ich inziwschen doch einiges in Richtung Smarthome - und Energiemonitoring betreibe - über verschiedene Lösungen, alle sammeln sich in HomeAssistant. Nun war meine Idee, mit meinen Tinkerforge komponenten etwas zu realisieren, was ebenfalls in HomeAssistant eingebunden werden kann. Dazu gibt es hier ja bereits ein paar Ideen für die Anbindung Aber auch die neuen ESP32 Boards klingen hier "spannend" - denn mit ESPHome sollte ggf. auch hier eine Anbindung an HomeAssistant möglich sein. Derzeit habe ich folgende Komponenten von TF zur Auswahl: 1x RedBrick 2x MasterBrick 1.1 2x MasterBrick 2.1 2x Chibi-Extension 1.0 1x Wifi-Extension 1.0 1x Wifi-Extension 2.0 1x Ethernet-Extension 1.0 1x PowerSupply StepDown 1.1 Bricklets (Steuerung): 1x LinearPoty 1.1 2x Joystick 1.1 1x RotaryEncoder 1.0 1x RFID / NFC Reader 1x Keypad 4x3 "MultiTouch" 1.0 Bricklets (Ausgabe): 1x Oled Display 128x64 1.0 Bricklets (Sensorik): 2x Temperature 1.1 2x Barometer 1.0 1x Hummidity 1.1 1x Temperature IR 1.1 1x Accelerometer 1.0 1x Realtime Clock 1.0 Bricklets: 1x PTC 1.0 2x IO-4 1.1 1x Dual Relay 1.1 z.B. für eine kleine Wetterstation habe ich eigentlich die "meisten" Komponenten schon zusammen - temperatur, hummidity und Barometer... Auf der anderen Seite habe ich für eine Wetterstation aktuell eher keine Verwendung... Natürlich kann ich mir die Wetterdaten einfach in HomeAssistant ausgeben lassen, aber "was bringt es"? Ich habe aktuell noch nichts, wofür ich diese Daten wirklich benötigen könnte...🤔 Des weiteren stehen mir aktuell noch zwei Arduino-Boards, ein Wmos D1 R2 (ESP 8266) und 'einige' Komponenten dafür zur Verfügung, wie mehrere Rotary Encoder, Potentiometer, Distance IR, 7-Segment LEDs, usw... Vielleicht kann man diese Komponenten in ein Projekt mit aufnehmen? Ich habe jetzt auch gesehen, dass durchaus ein paar Interessante Zubehör-Komponenten im Shop vorhanden sind - wie z.B. Hutschienen-Adapter ... Ach ja... eine PV Anlage ist vorhanden (aber hier wird schon der gesamte Energiefluss erfasst) - und eine Wallbox ist ebenso vorhanden - welche selbstständig PV Überschuss verwalten kann, da sie mit dem Wechselrichter der PV kommuniziert. - Haut raus, was für Einsatzzwecke Euch mit den o.g. Komponenten einfallen... :D Ich versuche derweil mir ebenfalls noch etwas einfallen zu lassen ^^
-
Hallo Zusammen, ich habe gerade noch einmal ein paar Tests gemacht, und möchte hier kurz die Ergebnisse ausführen... vielleicht sollte in den Dokumentationen erwähnt werden, welche Kombinationen NICHT möglich sind, bzw. dass zwingend eine bestimmte Reihenfolge der Extensions eingehalten werden sollte. Testaufbau: 1x MasterBrick 2.1 FW: 2.4.7 1x Ethernet w/o PoE 1.0 1x Wifi 1.0 1x Wifi 2.0 1x Chibi ---- TestRun 1 ---- 1) Ethernet 1.0 (w/o PoE) + MasterBrick oben drauf: Sowohl MasterBrick, wie MasterExtension werden erkannt 2) Wifi 1.0 + MasterBrick oben drauf: Es wird NUR der MasterBrick erkannt, die MasterExtension jedoch nicht 3) Wifi 2.0 + MasterBrick oben drauf: Es wird NUR der MasterBrick erkannt, die MasterExtension jedoch nicht 4) Chibi + MasterBrick oben drauf: Es wird NUR der MasterBrick erkannt, die MasterExtension jedoch nicht ------------------- ---- TestRun 2 ---- 1) MasterBrick + Ethernet 1.0 (w/o PoE) oben drauf: Sowohl MasterBrick, wie auch MasterExtension werden erkannt 2) MasterBrick + Wifi 1.0 oben drauf: Sowohl MasterBrick, wie auch MasterExtension werden erkannt 3) MasterBrick + Wifi 2.0 oben drauf: Sowohl MasterBrick, wie auch MasterExtension werden erkannt 4) MasterBrick + Chibi oben drauf: Sowohl MasterBrick, wie auch MasterExtension werden erkannt ------------------- ---- TestRun 3 : Combination of different MasterExtensions ---- 1) MasterBrick + Ethernet 1.0 (w/o PoE) + Wifi 1.0 Nur MasterBrick wird Erkannt MasterBrick startet immer wieder neu 2)MasterBrick + Ethernet 1.0 (w/o PoE) + Wifi 2.0 keines der Geräte wird erkannt MasterBrick startet immer wieder neu 3) MasterBrick + Ethernet 1.0 (w/o PoE) + Chibi Alle drei Geräte werden korrekt erkannt MasterBrick startet immer wieder neu 4) MasterBrick + Wifi 1.0 + Chibi Alle drei Geräte werden korrekt erkannt Kein Reboot des MasterBricks zu erkennen 5) MasterBrick + Wifi 2.0 + Chibi keines der Geräte wird erkannt MasterBrick startet immer wieder neu --------- Vielleicht / Hoffentlich sind diese Infos hilfreich - zum einen um ggf. die FW Versionen weiter zu optimieren - oder aber in den Dokumentationen auf mögliche inkompatibilitäten untereinander hin zu weisen. Mir ist klar, dass einige (die meisten) der hier getesteten Kombinationen vermutlich wenig Sinn im Einsatz ergeben werden - dennoch sollte der Master z.B. nicht einfach neu starten - oder mal die eine oder gar keine Extension, oder schlicht selber nicht mehr im BrickV auftauchen Egal, wie "unverständlich" die Kundenkonfiguration zu diesem Zeitpunkt vielleicht sein mag :) Grüße, Chris
-
Hi Zusammen, ich wollte mal nachfragen, ob es auch für bereits ab gekündigte Master-Extensions noch Korrekturen in der Firmware geben wird, oder eher nicht mehr... Bzw. gibt es irgendwo eine Liste, welche Extensions miteinander kombinierbar sind und welche nicht, bzw. wie viele Extensions genau in einem Stapel eingesetzt werden können? Zu meiner Situation: Ich habe jetzt insgesamt: 2x Master Brick 1.0 2x Master Brick 2.0 1x Master Brick 2.1 1x WiFi Extension 2.0 1x WiFi Extension 1.0 2x Chibi Extension 1x Ethernet w/o PoE Alle Bricks und co. sind auf dem aktuellen Firmwarestand. Master Brick + WiFi 2.0 + Chibi -> führt zu einem regelmäßigen Neustart des Stapels, es kann keine Verbindung zum Stapel aufgebaut werden. Ziel wäre es hierbei jetzt gewesen, per WLan eine Verbindung zum Stapel 1 herzustellen, und dieser wiederum per Chibi (Master) zu einem weiteren Stapel mit Chibi (Slave) zu verbinden. Somit könnte man zwei Stapel voneinander Getrennt wie einen stapel behandeln, die Kommunikation zwischen PC und Stapel 1 wäre dann aber ebenfalls noch Kabellos möglich. Dies kann mit dem WiFi 2.0 wenn ich es in der Dokumentation jetzt richtig gesehen habe nur via MESH Netzwerk realisiert werden, richtig? Gruß, Chris folgendes Verhalten ist mir aufgefallen:
-
Pixel 2 von Google... sollte, wenn ich mich nicht täusche über NFC verfügen... stimmt, habe auch schon daran Gedacht, das mit dem Smartphone zu testen... nur habe ich eher weniger Aussichten darauf, dass das erfolgreich sein könnte. Aber ja, werde es mal versuchen (btw.: habe die Karte auch hier in der Firma mal vor ein Lesegerät gehalten - wurde auch nicht erkannt ... somit sinkt die Wahrscheinlichkeit, dass die Karte i.O. sein wird nochmals.)
-
Hi Zusammen Ich habe hier kürzlich ein Paket mit älterer TF Hardware erstanden - darunter war auch ein NFC / RFID Bricklet enthalten, sowie eine Keyring Chip und eine MiFare Classic Karte. Den KeyRing Chip erkennt das Modul ohne Probleme, die MiFare Karte jedoch nicht. Testweise habe ich dann mal versucht, meine Kreditkarte, sowie meine Bankkarte zu lesen (beide bieten Sie Kontaktloses Bezahlen) - und hier wird auf jeden Fall etwas gelesen. Ich denke daher mal, dass die Karte Ihren Geist aufgegeben haben wird - aber gibt es ggf. noch eine Möglichkeit, das SICHER fest zu stellen? Gruß, Christoph
-
Danke - auch für den Ausschnitt aus dem IPConnection! Werde mir deine Vorschläge - und auch die anderen Callbacks mal genauer anschauen... Wie gesagt, werde es mal probieren, mit dem BeginInvoke() ...
-
Hallo Zusammen, aktuell schafft es mein Programm, darauf zu reagieren, wenn an einem MasterBrick a) der USB Stecker gezogen wird und b) der Release-Knopf gedrückt wird. In diesem Fall wird mir meine Liste mit verbinundenen Bricks durch eine erneute Enumerierung neu aufgebaut. Allerdings würde ich ganz gerne eine Ausgabe schaffen, die dem Benutzer mitteilt, warum sich die Software quasi "neu" mit dem Stapel verbunden hat. In den Events ConnectedCB und DisconnectedCB habe ich folgende Ausgaben aus der Doku übernommen: //============================================================================================================= // Callback handles reconnection of IP Connection private void ConnectedCB(IPConnection sender, short connectReason) { switch (connectReason) { case IPConnection.CONNECT_REASON_REQUEST: MessageBox.Show("Connected by request"); break; case IPConnection.CONNECT_REASON_AUTO_RECONNECT: MessageBox.Show("Auto-Reconnected"); break; } try { ipcon.Enumerate(); } catch (Exception ex) { d_Logger.CreateLogFile(ex.Message, "[8]"); } } //============================================================================================================= // Callback handles disconnections of IP Connection private void DisconnectedCB(IPConnection sender, short disconnectReason) { switch (disconnectReason) { case IPConnection.DISCONNECT_REASON_REQUEST: conn_status = false; MessageBox.Show("Disconnected by request"); break; case IPConnection.DISCONNECT_REASON_ERROR: MessageBox.Show("Disconnected by error"); break; case IPConnection.DISCONNECT_REASON_SHUTDOWN: MessageBox.Show("Disconnected by shutdown"); break; } if (conn_status == true) { try { ipcon.Enumerate(); } catch (Exception ex) { d_Logger.CreateLogFile(ex.Message, "[8]"); } } } Diese funktionieren auch wunderbar, wenn ich die Verbindung via ButtonClick aufbaue und trenne, oder wenn ich z.B. den BrickDeamon Dienst neu starte... Aber gibt es auch eine Möglichkeit, zu ermitteln, wenn z.B. das USB Kabel gezogen wurde, oder der Release Knopf gedrückt wurde? Wie könnte ich am besten auf solche Ereignisse reagieren und zurück geben?