


xsherlock
Members
-
Benutzer seit
-
Letzter Besuch
Alle erstellten Inhalte von xsherlock
-
Ok this question might be very ignorant, but how do you setup multiple masterbricks in the openhab? My house will have 7 separate master bricks (one per room to control the light switches, blinds and provide temp readout) all of them with Eternet POE extensions so they will have separate IP's how do I setup them in the openhab.cfg? What is the suntax for the second masterbrick? first is defined as: tinkerforge:hosts=172.16.2.156 And the second?
-
Looking forward to your findings. I would prefer my smart home to be a regular AQI station, but maybe it wil give some relevant data anyway. Maciej
-
Looks good no bogus numbers since nov-2 when I implemented the change mysql> select * from Item4 where Value >30 -> ; +---------------------+-------+ | Time | Value | +---------------------+-------+ | 2015-10-24 09:47:46 | 32.93 | +---------------------+-------+ 1 row in set (0.16 sec) mysql> select * from Item4 where Value <10 -> ; +---------------------+---------+ | Time | Value | +---------------------+---------+ | 2015-10-13 23:38:41 | -79.06 | | 2015-10-14 14:14:05 | -111.06 | | 2015-10-30 15:51:15 | -31.06 | +---------------------+---------+ 3 rows in set (0.12 sec)
-
Is dust sensor detecting any standarized dust particle size, like PM10 or PM2.5 Can it be used for the smog detection? The spec of the sensor is not saying that? MAciej
-
ok added that to the config, now we need just to wait a bit. I did not have any entries in the openhab.cfg regarding the specific briclets. I addedd tinkerforge:hosts=172.16.2.156 tinkerforge:temperature.uid=qnM tinkerforge:temperature.type=bricklet_temperature tinkerforge:temperature.slowI2C=True Can I still refer to this bricklet by the uid in the items. Number GF_Living_Temperature "Temperature [%.1f C]" <temperature> (GF_Living) {tinkerforge="uid=qnM"}
-
Every week or so a temp sensor that sits on a wall of my not so hot house , comes up with a readout that should not happen. In openhab it screws up autoscale graphs. I could add filtering rule but that should not happen in the first place. mysql> select * from Item4 where Value >30 -> ; +---------------------+-------+ | Time | Value | +---------------------+-------+ | 2015-10-12 21:47:03 | 80.93 | | 2015-10-21 01:23:41 | 48.93 | +---------------------+-------+ 2 rows in set (0.08 sec)
-
The rest interface is available over http://xxx.xxx.xxx.xx:8080/rest/items It give you back state of all the items in XML. it is an integral part of openhab. So is that true that a your binding is not looking at all at the sensor state formatting parameters in the .items file and just passes to openhab full precision? is that with all the other bindings? Fixing that afterwards in the openhab is quite a pain as requires creating a rule executing on every update. Would you consider adding a parameter to binding in order to to return rounded result? This sensor has so much jitter that last digit is meaningless anyway. I would also "fix" the current/voltage binding to give an option to return, voltage/current/power in V/A/W with definded precision and not the millis.
-
Not sure if that is a bug or a feature? I define Temp sensor wit default xx.y precision. Number GF_Living_Temperature "Temperature [%.1f C]" <temperature> (GF_Living) {tinkerforge="uid=qnM"} I would expect that when acccessing those from the Rest interface it will be already rounded but it is not. <item> <type>NumberItem</type> <name>GF_Living_Temperature</name> <state>26.68</state> <link> Is that intended? Maciej
-
If I power the stack with Step-Down Power Supply brick with 12V and that Voltage is passed to the MAster Brick. Do I still need external power supply conected to the Analog out 2 bricklet to make 0-10V signal? Maciej
-
If you do anything mission critical I would upgrade the master bricks immediately. I just ended troubleshooting simple relay+ LCD + thermometer setup running python script that was stopping to run function on temp update after 2 to 4 days. It magically fixed itself after re flashing the master bricks to latest firmware. Lucky that was a test setup but in intended setup this bug would mean I would boil 1.2 m3 of heating water container, by not running a fail -safe switch function. Scary.
-
Does domoticz has some easy way to access TF components? I see it has some nicer interface then openhab that is installed by default on the red brick.
-
is the persistance option with the database running on the image 1.7 openhab install? Maciej
-
Is there a way to run openhab 2 with nice paperUI on the Redbrick? Do we have all the bindings for TF bricks for openhab 2? Or just a better UI on the openhab that comes with the image 1.7? The old iphone look is a bit dated. Regards Maciej
-
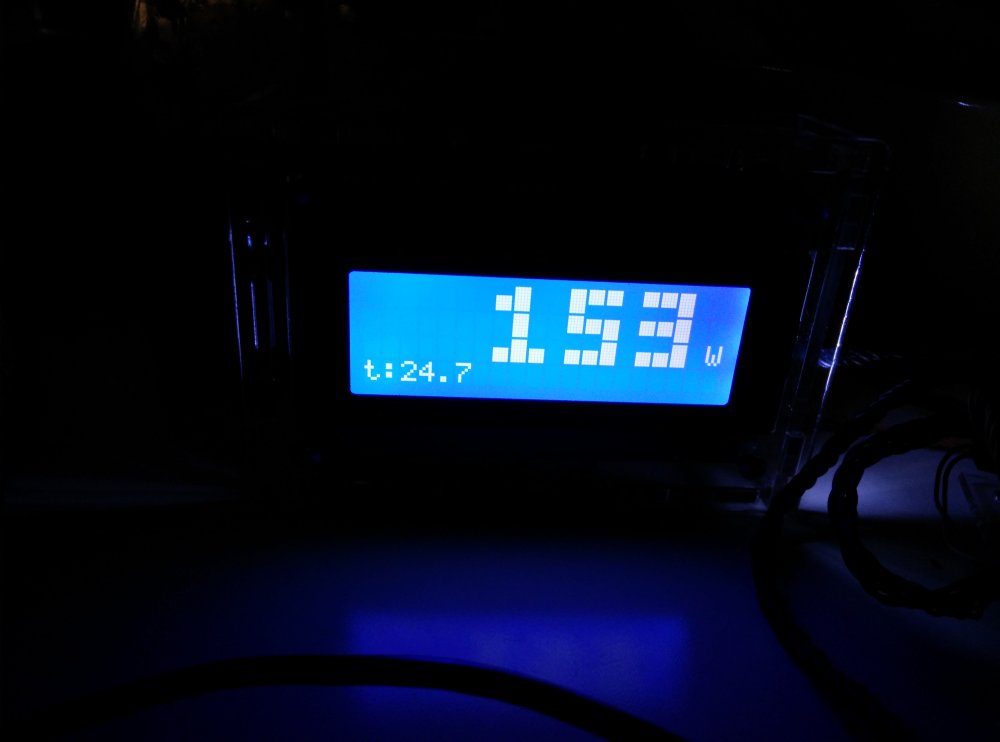
I have two litte todlers that will wake up any moment and you really made me do late in night.... Prints a 4 digit readout in a nice large font... lcd.set_custom_character(0,[31,31,31,31,31,31,31,31]) lcd.set_custom_character(1,[31,31,31,31,31,0,0,0]) lcd.set_custom_character(2,[0,0,0,31,31,31,31,31]) lcd.set_custom_character(3,[0,0,0,0,0,0,0,0]) lcd.set_custom_character(4,[31,31,31,31,31,31,0,0]) lcd.set_custom_character(5,[0,31,31,31,31,31,0,0]) lcd.set_custom_character(6,[0,31,31,31,31,31,31,31]) def print_large_digit(x,y,digit): if digit==0: lcd.write_line(x,y,chr() lcd.write_line(x,y+1,chr(9)) lcd.write_line(x,y+2,chr() lcd.write_line(x+1,y,chr() lcd.write_line(x+1,y+1,chr(11)) lcd.write_line(x+1,y+2,chr() lcd.write_line(x+2,y,chr() lcd.write_line(x+2,y+1,chr(10)) lcd.write_line(x+2,y+2,chr() elif digit==1: lcd.write_line(x,y,chr(10)) lcd.write_line(x,y+1,chr() lcd.write_line(x,y+2,chr(11)) lcd.write_line(x+1,y,chr(11)) lcd.write_line(x+1,y+1,chr() lcd.write_line(x+1,y+2,chr(11)) lcd.write_line(x+2,y,chr(10)) lcd.write_line(x+2,y+1,chr() lcd.write_line(x+2,y+2,chr(10)) elif digit==2: lcd.write_line(x,y,chr(9)) lcd.write_line(x,y+1,chr(9)) lcd.write_line(x,y+2,chr() lcd.write_line(x+1,y,chr(14)) lcd.write_line(x+1,y+1,chr(13)) lcd.write_line(x+1,y+2,chr(12)) lcd.write_line(x+2,y,chr() lcd.write_line(x+2,y+1,chr(10)) lcd.write_line(x+2,y+2,chr(10)) elif digit==3: lcd.write_line(x,y,chr(9)) lcd.write_line(x,y+1,chr(9)) lcd.write_line(x,y+2,chr() lcd.write_line(x+1,y,chr(13)) lcd.write_line(x+1,y+1,chr(13)) lcd.write_line(x+1,y+2,chr() lcd.write_line(x+2,y,chr(10)) lcd.write_line(x+2,y+1,chr(10)) lcd.write_line(x+2,y+2,chr() elif digit==4: lcd.write_line(x,y,chr() lcd.write_line(x,y+1,chr(11)) lcd.write_line(x,y+2,chr() lcd.write_line(x+1,y,chr(12)) lcd.write_line(x+1,y+1,chr(13)) lcd.write_line(x+1,y+2,chr() lcd.write_line(x+2,y,chr(11)) lcd.write_line(x+2,y+1,chr(11)) lcd.write_line(x+2,y+2,chr() elif digit==5: lcd.write_line(x,y,chr() lcd.write_line(x,y+1,chr(9)) lcd.write_line(x,y+2,chr(9)) lcd.write_line(x+1,y,chr(12)) lcd.write_line(x+1,y+1,chr(13)) lcd.write_line(x+1,y+2,chr(14)) lcd.write_line(x+2,y,chr(10)) lcd.write_line(x+2,y+1,chr(10)) lcd.write_line(x+2,y+2,chr() elif digit==6: lcd.write_line(x,y,chr() lcd.write_line(x,y+1,chr(9)) lcd.write_line(x,y+2,chr(9)) lcd.write_line(x+1,y,chr() lcd.write_line(x+1,y+1,chr(13)) lcd.write_line(x+1,y+2,chr(14)) lcd.write_line(x+2,y,chr() lcd.write_line(x+2,y+1,chr(10)) lcd.write_line(x+2,y+2,chr() elif digit==7: lcd.write_line(x,y,chr(9)) lcd.write_line(x,y+1,chr(9)) lcd.write_line(x,y+2,chr() lcd.write_line(x+1,y,chr(11)) lcd.write_line(x+1,y+1,chr(11)) lcd.write_line(x+1,y+2,chr() lcd.write_line(x+2,y,chr(11)) lcd.write_line(x+2,y+1,chr(11)) lcd.write_line(x+2,y+2,chr() elif digit==8: lcd.write_line(x,y,chr() lcd.write_line(x,y+1,chr(9)) lcd.write_line(x,y+2,chr() lcd.write_line(x+1,y,chr() lcd.write_line(x+1,y+1,chr(13)) lcd.write_line(x+1,y+2,chr() lcd.write_line(x+2,y,chr() lcd.write_line(x+2,y+1,chr(10)) lcd.write_line(x+2,y+2,chr() elif digit==9: lcd.write_line(x,y,chr() lcd.write_line(x,y+1,chr(9)) lcd.write_line(x,y+2,chr() lcd.write_line(x+1,y,chr(12)) lcd.write_line(x+1,y+1,chr(13)) lcd.write_line(x+1,y+2,chr() lcd.write_line(x+2,y,chr(10)) lcd.write_line(x+2,y+1,chr(10)) lcd.write_line(x+2,y+2,chr() elif digit==99: lcd.write_line(x,y,chr(11)) lcd.write_line(x,y+1,chr(11)) lcd.write_line(x,y+2,chr(11)) lcd.write_line(x+1,y,chr(11)) lcd.write_line(x+1,y+1,chr(11)) lcd.write_line(x+1,y+2,chr(11)) lcd.write_line(x+2,y,chr(11)) lcd.write_line(x+2,y+1,chr(11)) lcd.write_line(x+2,y+2,chr(11)) def print_large_4(x,y,number ): number_str = str(number) if number < 1000: if number < 100: print_large_digit(x,y,99) print_large_digit(x,y+4,99) digit_3 = int(number_str[0]) digit_4 = int(number_str[1]) else: print_large_digit(x,y,99) digit_2 = int(number_str[0]) digit_3 = int(number_str[1]) digit_4 = int(number_str[2]) print_large_digit(x,y+4,digit_2) else: digit_1 = int(number_str[0]) digit_2 = int(number_str[1]) digit_3 = int(number_str[2]) digit_4 = int(number_str[3]) print_large_digit(x,y,digit_1) print_large_digit(x,y+4,digit_2) print_large_digit(x,y+8,digit_3) print_large_digit(x,y+12,digit_4)
-
It worked! on the brick viewer it goes up to 4-6 lux from 0.0 lux. So with the treshold of 3 it counts flashes from a tiny red led on the power counter just fine.
-
I did pressed scan numerous times. IF both AP's had the same password, the brick would sometimes connect to the other AP after reboot. I had to resort to changing the password to the sensor AP so the brick connects uniquely to it.
-
how do I make red brick forget one of the wifi networks. I made an additional wifi net for sensors and moved all the masterbricks with wifi to it with no problem. But the redbrick that controls them keeps getting back to the old networks. How do I wipe clean the wifi setup so it only connects to the right one. Maciej
-
I have an idea that you could bring large font support for the 4x20 LCD Especialy it would be nice to have 3x3 large font like this one http://hifiduino.blogspot.it/2009/05/improved-display.html At least for numbers. So I can make nice readouts that can be read from afar. I know that it can be done with 5" LCD but that requires designing UI as a webpage and is a lot of work for simple hacks.
-
on the image 1.5 it works! I install apsscheduler with sudo pip install apscheduler and then it work with python ver 2.7.8 and that is what I do not understand why it does not work with 3.4.2. Do I need to instal apscheduler separately to 3.4.2 in the terminal? Maciej
-
Can I use it to detect the flashes of red led on the grid Power Metter. I have such a system done on the RPI with custom photoresistor but it would be so much easier just to get the bricklet. The envirnment will be pitch black and the sensor will by glued to the led, but the flash is short, maybe 50 ms. Is that enought to register the change by the ambient light sensor? I miss the info in the documentation how fast is the sampling on that one. Regards Maciej
-
Indeed when running the import from the python shell I also dont see the error. Just the software will not run if uploaded with the BrickV If I ssh into the brick and run it manualy in the terminal it will start fine. but then it will crash when i start a tread (with the scheduler) It looks that it half-works on the pytnon 2.7.3 but not on the 3.2.3 and my development PC has version 3.4.1. Is there a way to upgrade the python verison on the brick.
-
Thanks, It was it as well as misconfigured DNS. but still no success in running the very same software that works fine on same setup when launched from the PC. 2015-01-02T18:09:40.316286+0100 ------------------------------------------------------------------------------- Traceback (most recent call last): File "Power logger.py", line 20, in <module> from apscheduler.schedulers.background import BackgroundScheduler ImportError: No module named apscheduler.schedulers.background What else could that be? It works in the win7 PC. #!/usr/bin/env python # -*- coding: utf-8 -*- HOST = "172.16.0.39" PORT = 4223 UID_lcd = "o73" # Change to your UID UID_poti = "fwV" UID_dual_button = "mEa" UID_dual_relay = "kDz" UID_voltage = "nNc" UID_step = "6RsbXm" UID_temp = "qnM" UID_nfc = "oEh" import binascii import time import datetime from datetime import datetime from apscheduler.schedulers.background import BackgroundScheduler from tinkerforge.ip_connection import IPConnection from tinkerforge.bricklet_lcd_20x4 import LCD20x4 from tinkerforge.bricklet_linear_poti import LinearPoti from tinkerforge.bricklet_dual_button import DualButton from tinkerforge.bricklet_dual_relay import DualRelay from tinkerforge.bricklet_voltage_current import VoltageCurrent from tinkerforge.brick_stepper import Stepper from tinkerforge.bricklet_temperature import Temperature from tinkerforge.bricklet_nfc_rfid import NFCRFID global running_time running_time=0 def cb_current(current): lcd.write_line(1, 0, str(round(current/1000.0,2)) + 'A ') voltage = vc.get_voltage() lcd.write_line(1, 14, str(round((voltage * current)/1000000.0,2)) + 'W ') def cb_voltage(voltage): lcd.write_line(1, 7, str(round(voltage/1000.0,2)) + 'V ') current = vc.get_current() lcd.write_line(1, 14, str(round((voltage * current)/1000000.0,2)) + 'W ') def cb_pressed(i): if i==0: # datetime.now().strftime('%Y-%m-%d %H:%M:%S') log_started = datetime.now().time() lcd.write_line(2, 0, 'Logging ' + datetime.now().strftime('%H:%M:%S')) sched.add_job(job_function, 'interval', seconds=1) global running_time running_time=0 if i==3: lcd.write_line(2, 0, 'Stopped ' ) time.sleep(2) lcd.write_line(2, 0, ' ' ) sched.remove_all_jobs() def job_function(): voltage = vc.get_voltage() current = vc.get_current() global running_time print(str(running_time+1)+','+datetime.now().strftime('%H:%M:%S') + ',' + str(round(voltage/1000.0,2)) + ',' + str(round(current/1000.0,2)) + ',' + str(round((voltage * current)/1000000.0,2))) running_time=running_time+1 if __name__ == "__main__": ipcon = IPConnection() # Create IP connection lcd = LCD20x4(UID_lcd, ipcon) # Create device object poti = LinearPoti(UID_poti, ipcon) db = DualButton(UID_dual_button, ipcon) # Create device object dr = DualRelay(UID_dual_relay, ipcon) vc = VoltageCurrent(UID_voltage, ipcon) stepper = Stepper(UID_step, ipcon) t = Temperature(UID_temp, ipcon) nfc = NFCRFID(UID_nfc, ipcon) ipcon.connect(HOST, PORT) # Connect to brickd Don't use device before ipcon is connected sched = BackgroundScheduler() sched.start() lcd.backlight_on()# Turn backlight on # Write "Hello World" lcd.register_callback(lcd.CALLBACK_BUTTON_PRESSED, cb_pressed) vc.set_current_callback_period(1000) vc.register_callback(vc.CALLBACK_CURRENT, cb_current) vc.set_voltage_callback_period(1000) vc.register_callback(vc.CALLBACK_VOLTAGE, cb_voltage) current = vc.get_current() voltage = vc.get_voltage() lcd.clear_display() lcd.write_line(0, 0, 'Curr Volt Power ') lcd.write_line(1, 0, str(round(current/1000.0,2)) + 'A ') lcd.write_line(1, 7, str(round(voltage/1000.0,2)) + 'V ') lcd.write_line(1, 14, str(round((voltage * current)/1000000.0,2)) + 'W ') lcd.write_line(3, 0, 'Start Stop') input('Press key to exit\n') # Use input() in Python 3 ipcon.disconnect()
-
Ok this question will be quite a dumb one, but can I upgrade the image that is running already on the redbrick and not loose my settings and programs? Or the only way is to flash the new image onto the sd card.? Regards Maciej
-
Dear, I need apscheduler for my python program (quite useful bit) but pip is falling on the instalation. How do I make it install it. tf@red-brick:~$ pip install apscheduler Downloading/unpacking apscheduler Cannot fetch index base URL https://pypi.python.org/simple/ Could not find any downloads that satisfy the requirement apscheduler Cleaning up... No distributions at all found for apscheduler Storing debug log for failure in /home/tf/.pip/pip.log TIA
-
It would be nice if the Bricks have SNMP bindings for the RedBrick, Ethernet and Wifi. So I would be able to query bricklets sensors for the status from some high level SNMP monitoring system. . Generating traps would be another step. Also the step down power suppply could have a wider range of supply 6V to 60V so it can be used in the industrial enviroment where we have -48V power (that is usualy -56V really)
